Let's crafty!

Let's crafty!
Showing posts with label friends. Show all posts

Monday, March 28, 2016

Work in Progress: Hexie Quilt From Recycled Men's Dress Shirts

This is my slow quilt project. It's my first attempt at English Paper Piecing (EPP), which I was scared of but I LOVE it. It has a special feel to be doing all the piecing by hand, I love hand stitching and seeing the piece build slowly.

dress shirt quilt

I also loooooove cutting shapes so this has been great fun. I probably have cut several hundred fabric hexagons.

I'm using hexagons with 1.5 inch sides. I found a template on Pinterest...which after using for some time I realized the sides of the hexagons in the template are not exactly the same length! Ack! This will teach me not to be cheap! Next time I will buy the pre-cut templates :( I have a workaround for now, I am just very careful to place all the hexies all facing the same direction. It's a little more of a pain though.


My process for this quilt so far has been:
1) Cut paper templates and also a paper "cutting template" with the seam allowance built in to use to cut the fabric around. I reused scrap printer paper which is nice because it is flexible enough to bend/fold when sewing pieces together.
2) Get used button-down shirts (more details below on shirt sources).
3) Deconstruct the shirts using Bonnie Hunter's awesome and efficient technique (discovered courtesy of Pinterest). This method helps you get the maximum usable quilt fabric out of each shirt.
4) Cut shirts into hexagons.
5) Pin fabric hexagon pieces to paper templates.
6) Baste fabric around (not to) the paper templates.
7) Stitch hexagons together as carefully and evenly as possible. Arranging them as you go is sorta fun to see the patterns. I'm keeping it somewhat random.
8) (This is fun too!) Pop out the paper hexagon once that piece is surrounded on all sides by other hexagons.
9) Rest hands. This has been a bit hard on my hands at times (Carpal Tunnel issues) so I can't do too much stitching at once.


I prefer using shirts that have some damage so that they're not wearable. I feel bad cutting up a nice shirt that could be donated to someone to wear. Although sometimes if the shirt is REALLY cheap and/or ugly I won't mind so much :) The larger the shirt, the better...it's more fabric. I love finding the ones that are like a men's 3X size. The shirts/fabric I'm using comes from a variety of sources:
  • Flea markets (got a huge bag of shirts for $4!)
  • Thrift stores. If you can find damaged shirts sometimes they will give you a bit of $ off the price...although it's going to charity anyway. Most of the stuff I have seen in thrift shops around here is in pretty good condition though.
  • Shirting sample cards (for some variety). Can find online sometimes in large lots.
  • Friends who had old dress shirts of their own around the house that were stained, holey, etc. This is my favorite! Because after it's done you will be able to say, "That blue hexagon is from Mark's work shirt! And that striped one is from my friend Ken!" So you get to keep a memory of your friends and family in the quilt.
More pictures soon!

Tuesday, March 8, 2016

Dog circle painting

A few weeks ago I heard from my friend Janel that she was having a bad day...my first thought was, maybe I can make her something to cheer her up. I was thinking of a circle painting and this one turned out to have a bit of a Mardi Gras feel to it.

Janel's favorite color: purple
Janel's favorite animal: puppies


Now I can't remember the last time (if ever) I tried to seriously draw a dog, let alone a puppy. Turns out I have no idea how dogs are shaped. Most of them came out real faily and either dumb looking or birdlike.

I got a bit frustrated at one point...hahahhaha

puppy sketch

Yep. Dogs.

materials: pencil, Prang semi-moist watercolors on Canson Montval Watercolor Block, Faber-Castell PITT artist pen (brush) in #177.


Monday, March 3, 2014

ZOMBIEPLATE

Here's another pottery piece I painted recently...this one was a special request by my friend Ryan. I'd never drawn a zombie before so I wasn't sure how it would turn out but I FRIGGIN LOVE IT. Definitely one of my best pieces :)

My favorite part? The dead fish carcass!
   

Tuesday, July 9, 2013

PYOP (Paint Your Own Pottery) Part 4

My friend Angie was in town this week and she is also crafty so we spent an afternoon at The Pottery Stop. I finished two pieces that came out pretty darn cute, if I do say so myself! Angie had never tried PYOP before and she had a great time and may be hooked on it too :) And her piece came out amazing!

Angie painted this lovely bowl (as part of a vertical spoon rest) with a Tuscan countryside scene.

 
I just love the koi on the inside of the bowl, what a beautiful touch! Angie has really meticulous attention to detail which paid off here, especially since the bowl is actually quite small (about 4 inches in diameter). It looks awesome.
 
This time I thought to take "before" photos of my pieces...partly to show the difference, and partly to remember what paint colors I used and how they looked before they were fired. I tend to use blues that are too dark and hide the black outlines and don't want to make that mistake on my next one.
 
Here's my three-section tray, with a ladybug, bird, and dragonfly. Before:
 
 
And after:


The ladybug was my favorite section on this one once it was fired. See what I mean about the overly dark blue sky in the other sections?
 
I also decided to paint a cute little design on the back.

 
After I finished this piece, I had some extra time while waiting for Angie to paint her tiny trees, etc. So I started a new tray (wavy sushi plate) with one of my favorite little scenes that I've painted in watercolor and other media before...whaley!

My little whale scene before:
 
 
And after being fired:
 
 
I love how bright all the colors turned out! And I did a little bit of a dotted texture detail in the coral, which came out better than expected. I added a silly little chicken legs box signature design on the back for fun:
 
 
We really had a great, relaxing day painting our pottery! What a nice way to spend the day with a friend :) And then picking up our pottery pieces was like a surprise present all over again, to see how they turned out!

Monday, May 6, 2013

Tea time (and Happy Benito Juarez Day Observed!)

On Friday, Brie and I both took off work to enjoy an afternoon tea (at Sweet Simplici-Tea in Sykesville) and some shopping. Well, actually we had been meaning to do this since March. There's a story to go with it...


Several years ago (probably 2006?) when Brie and I used to work together, we were supposed to go to one of those multi-day offsite regional work meetings that make you want to stab yourself in the eye. We were seriously dreading it and trying to think of reasons to say we couldn't go, so we looked up the date of the meeting on the calendar with the idea that we'd find some obscure holiday we just HAD to be away to celebrate. The only thing on March 21 was Benito Juarez Day. Neither of us had ever heard of Benito Juarez (turns out he is a former Mexican president) but it sounded good!

We ended up still going to the dang meeting, but every year Brie reminds me when Benito Juarez Day comes around in March...so this year we wanted to actually take the day off and amuse ourselves. And then I was in Europe for most of March so we rescheduled it for May 3. Now I just googled Benito Juarez Day and was stunned to see that someone else must have had the SAME IDEA!


In any case, tea was lovely. The most awkward part this time (usually something really awkward happens) was just me stupidly burning the crap out of my tongue drinking the tea as soon as it was poured.


The scones and quiche were friggin awesome! After tea, we enjoyed some shopping on Main Street in Sykesville at Alexandra's Attic and A La Mode Boutique...and later we somehow ended up buying shoes at DSW (because you always need more shoes). All in all, a fun day!
 
 
Happy Benito Juarez Day to you too!

Wednesday, May 1, 2013

Paint your own pottery

Check out what I made!


I recently tried one of those paint your own pottery things for the first time at The Pottery Stop. I wasn't sure how my piece would turn out since 1) it took me a hundred years to do, 2) I was trying a wax resist technique that seemed iffy, and 3) I made up the design as I went along. I also experimented with putting a ton of different paints in some of the areas which gave it a cool marble effect (but could equally have come out as a disaster for all I know).

But I totally love how this switchplate cover came out! The leaves look pretty cool. I would totally go again--and next time I want to make:
  • a larger switchplate
  • a round trinket box (maybe with a monarch butterfly on it?)
  • a large rectangular vase
A big thank you to Juli for introducing me to this fun crafty outing! :)

Saturday, December 29, 2012

Holiday happenings

This year, I spent Christmas Eve baking cookies and pizza with my brother...mmm pizza...
 
 
...and then a few days visiting with friends. I went to visit Gleb and we ambled through downtown Ambler and did a little shopping.
 

And even though the holidays were over, the owl ornaments were not! I made a large batch....most of these are now available in my etsy shop.


Saturday, October 27, 2012

Bird paintings for babies

Several of my friends have just welcomed new babies so I've been busy working on paintings for their gifts! 


I just love how cute they turned out!
 
materials: pencil, Prang semi-moist watercolors on Strathmore Wet Media paper, Faber-Castell PITT artist pen (brush) in #177, IKEA RIBBA frame.

Wednesday, June 22, 2011

Not-so-simple Simplicity Christening gown

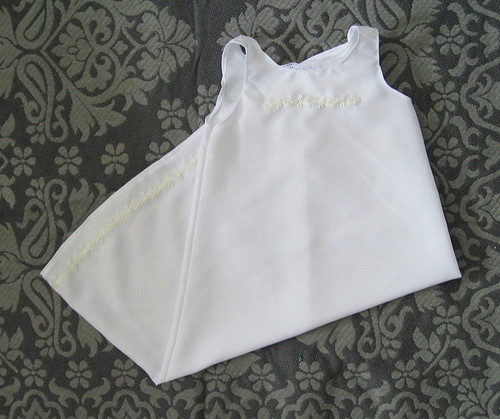
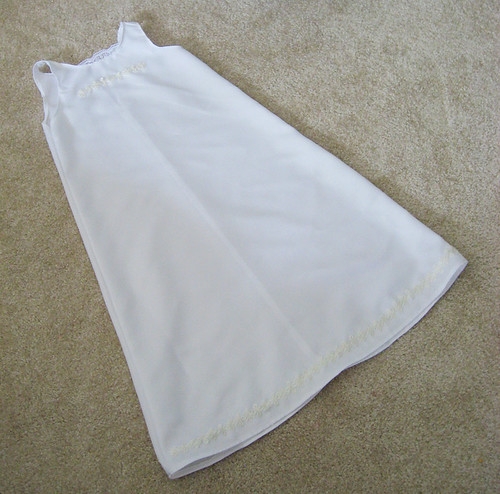
On Monday, Kate and I decided we should attempt to make our own christening gown for her newborn, Isaac. We had searched a bunch of thrift stores and consignment shops with no luck, and most of the gowns were ridiculously frilly (not to mention overpriced).

Isaac's christening gown

Neither of us has ever made a christening gown, but we figured it couldn't be too complicated, right? Kate found a Simplicity pattern and we used the sleeveless "slip" part of the pattern to make a simple gown.

I was NOT a fan of the instructions in the pattern. Lots of ambiguity and confusion. I ended up doing my own thing about halfway because there was so much cursing about the directions.

Christening gown

We did find some cute lace and other trim in my ribbon stash so I hand-stitched those on as an accent. Overall, it came out pretty decent. If I had to do this again, I'd use a simpler cotton fabric for the gown though...the stuff we used was stretchy and somewhat annoying.

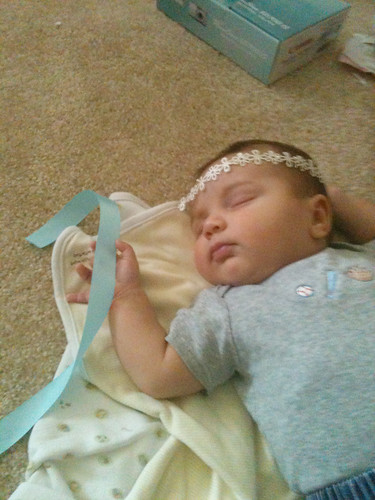
And here's baby Isaac, tired from all the crafting...

Isaac helping with the crafty
aww...

Wednesday, June 15, 2011

Meditations on moving


Yes, I have in fact noticed that I haven't posted anything in about a month. I have an excuse! I was moving! Haha...I know the move didn't take a full month (most of it was done in two days) but between the packing, unpacking, cleaning, perfectionist lining of my kitchen cabinets, organizing, and getting rid of stuff, it's been super busy.

My thoughts on moving:

1) It will always take you at least 50% longer than you think, and you have at least 50% more stuff than you think. Yeah, I had no idea I'd be packing 100 boxes. (And now unpacking them...)
2) Friends are awesome! I used movers for my furniture, but my friends helped by providing boxes, packing boxes, moving stuff, unpacking my shoes and clothes, and organizing my movie collection. (Jyoti did this last task and she made categories such as "movies I like" and "things with non-humans." haha). My friends also supplied me with so much bubble wrap and packing paper that I didn't need to buy any, even with my extensive dish collection.
3) Start early. Man, I was still packing boxes when the movers arrived. I should have started waaaayyy earlier.
4) Unpacking is at least more amusing than packing. I keep finding things I packed and thinking, "What IS that?" and "Why did I keep it?" and "What was I thinking when I purchased it?" Case in point--the wooden pirate ship wheel pictured above. Where the heck am I going to put that?
5) Make lists! I had a list of my boxes, which ended up being not that necessary...but I could see how with a larger home or several people it would be important. However, my moving list of all the places I needed to change my address was crucial!
6) Moving in the summer stinks. Almost all of my past moves have been in the summer and even if it's not awful outside, I always end up lying on the floor somewhere thinking "ughhhhhhhh I'm gonna pass out."
7) Remember to drink water and eat! I was way behind on the day of the move and forgot to eat lunch. Luckily there was a Chipwich in the fridge in my old place so I devoured that :)

Overall, I have to say the move went really smoothly though. And I love the new place! Even if it does still resemble Boxland a little bit.
Related Posts Plugin for WordPress, Blogger...